
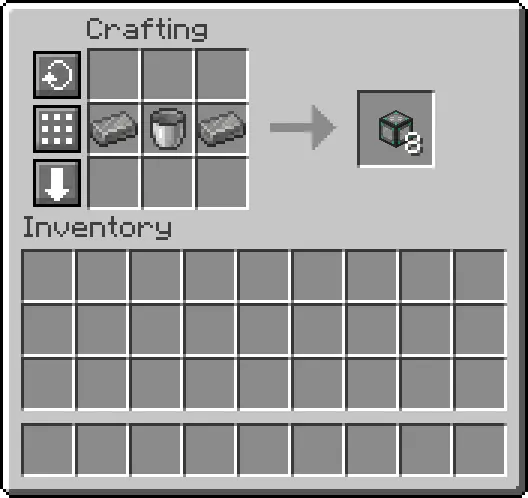
ORE PROCESSING
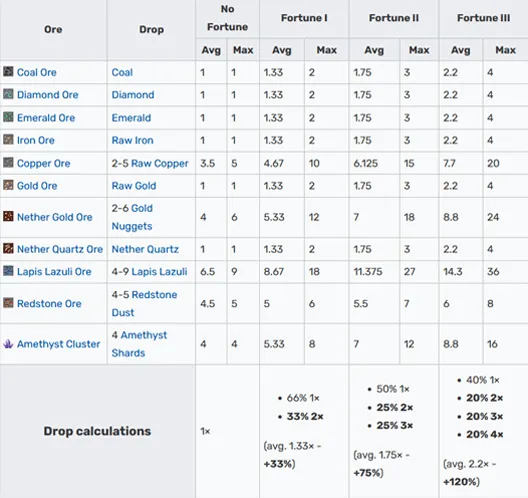
One of the main draws to Mekanism is its unique and scientific based approach to ore multiplying. In the base game, we have the fortune enchantment. With no enchantment on a pickaxe, you would get just 1 diamond from a diamond ore block. With fortune 3, that jumps up to an average of 2, with the maximum of 4. However it’s not guaranteed to get 4 or even 2 every time. With ore processing, not only are the conversion rates the same every time, but at the maximum tier, 3 raw ores will give you 10 ingots.
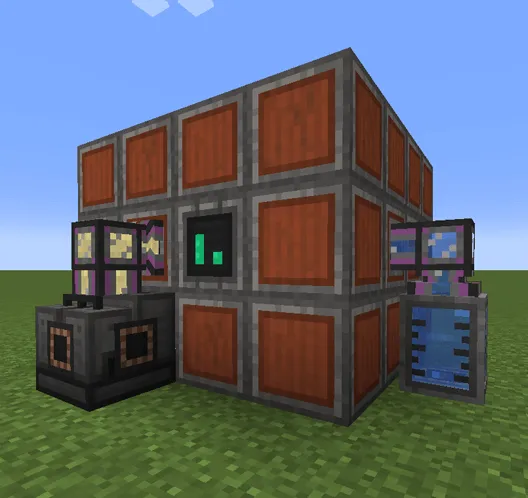
CABLES
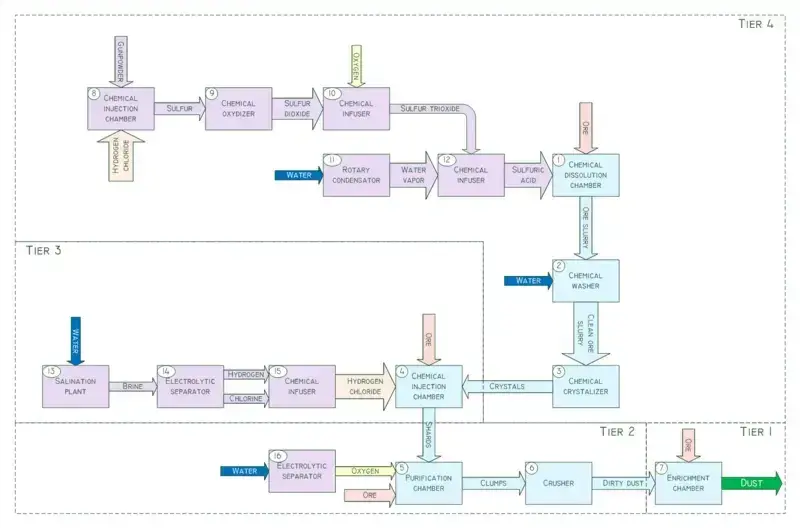
The flowchart shown here is a bit of a scary image, but we will be going through it step by step, tier by tier. We've already been introduced to the universal cable, which transfers energy, but there are 4 more types of cables in Mekanism. The logistical transporter, the thermodynamic conductor, the mechanical pipe and the pressurised tube. Like the universal cable, all of these cables have have four tiers, each holding more of and transferring their respective contents faster with each tier.
THE LOGISTICAL TRANSPORTER
The logistical transporter is for transferring items from one point to another. Items can be taken from dedicated storage systems or outputs from machines and sent to wherever you want. This is a great way to automate certain processes.
THE THERMODYNAMIC CONDUCTOR
The thermodynamic conductor transfers power in the form of heat. The conductor is affected by weather, warmer biomes speed up the process while colder biomes slow it down. This shouldn't be too great of a concern, but if it is, you can always make more heat sources.
THE MECHANICAL PIPE
The mechanical pipe is strictly for fluid transfer and can be connected to any block that supports fluid transfer.
THE PRESSURISED TUBE
The pressurised tube is strictly for gas transfer and can be connected to any block that supports gas transfer.
THE CONFIGURATOR
In order to choose what these cables will do once they're placed down, we can use the configurator. The configurator is a handy tool that acts as Mekanism's wrench. It can do a variety of things such as changing the input/output state of a machine by looking at it, rather than going into the UI. Changing the mode of a cable's transport, by shift right clicking a cable you can change it to: push, pull, none or back to normal. You can tell cables to be activated on redstone, empty machines or rotate them.
TIER ONE
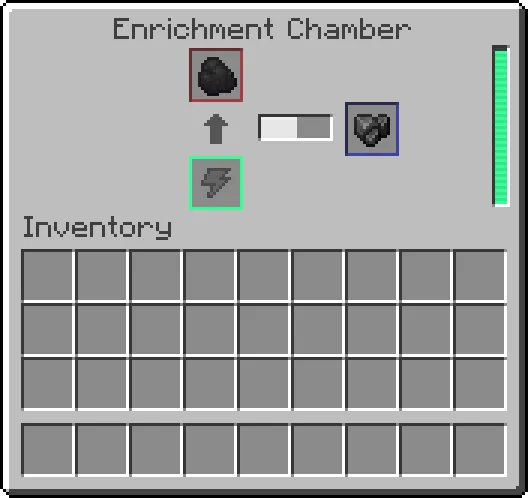
Tier one only involves a machine we already have: the enrichment chamber. As we know, we can place some materials in and get their enriched versions, but we can also place raw ore inside. Inserting 3 raw ore will give you four of its corresponding dusts. Those dusts can then be smelted into ingots, and thus, you have an extra ore. If you’re not interested in making many machines and processes in the chart above, you can stop here. Having an extra ore is already pretty good, but we can make that 5x. Its worth noting that whatever stage of the process you're at, remember to set your machines to auto eject items so they can work away without needing you. You can place the enrichment chamber right next to your energized smelter or furnace to speed up the process.
TIER TWO
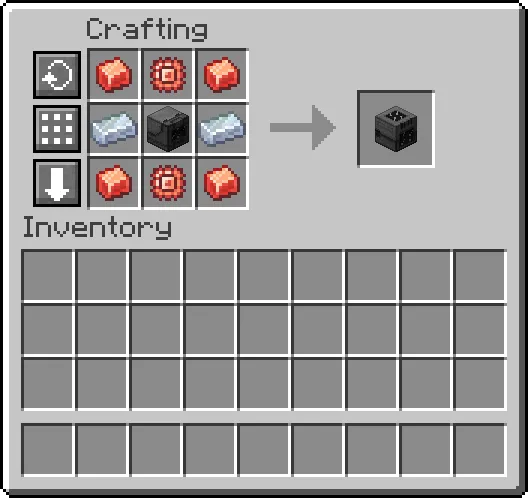
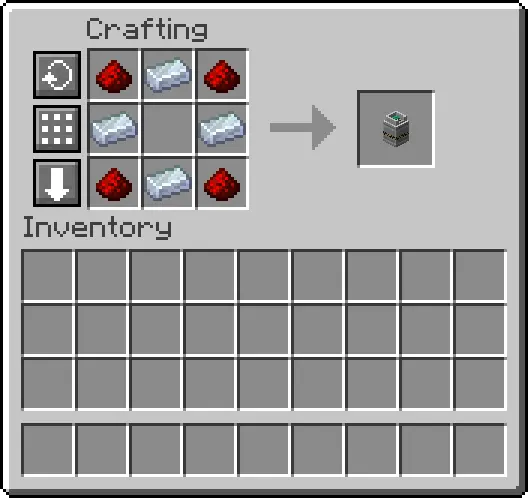
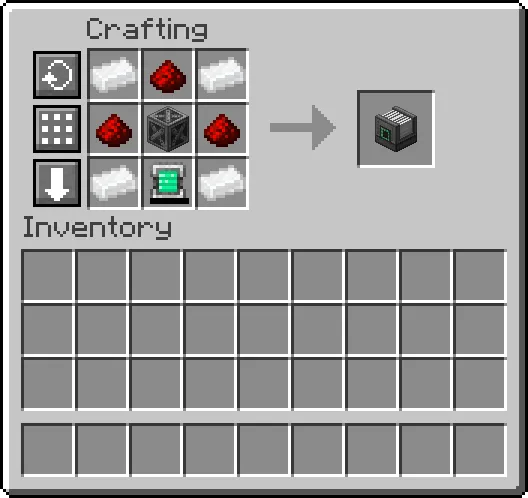
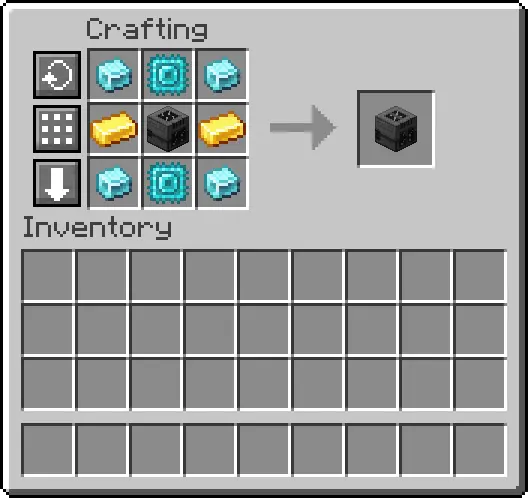
Tier two uses the crusher and a new machine, the purification chamber. The purification chamber is the first of many machines that will require a secondary input. In this case, of oxygen gas. The purification chamber's main component in crafting is another enrichment chamber.
THE ELECTROLYTIC SEPARATOR
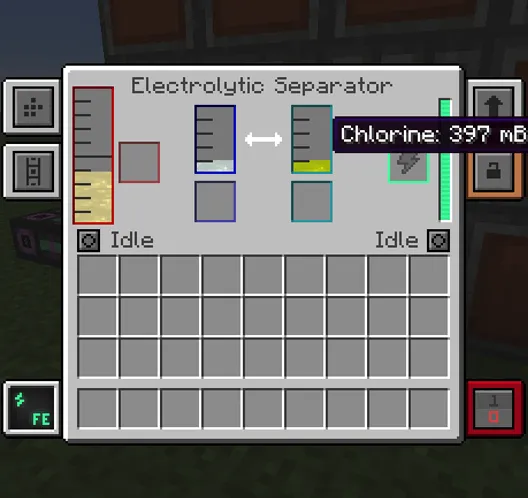
Oxygen can be generated through an electrolytic (ell-eck-tro-lit-ic) separator. This machine takes an input of fluid and outputs two gases. To make oxygen, we want to input water, which will separate it into hydrogen and oxygen. If the internal storage for the gases are filled up, the machine will stop working. We will be using the oxygen, but what about the hydrogen? Hydrogen will be useful to use later, but if you want, you can simply hit “DUMP” or “DUMP EXCESS”. This will empty the tank constantly allowing the machine to continue working. If you want to store it for later, we can make a chemical tank.
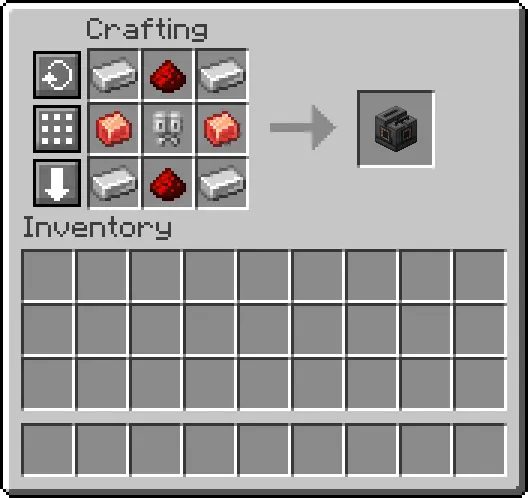
ELECTROLYTIC CORE
In order to craft the electrolytic separator, we will need an electrolytic core which is the main component of the machine. This is made from 5 basic alloys, 2 tin dusts, 1 iron dust and 1 gold dusts. All these dusts can be made by crushing either the ore block, the raw ore or an ingot of the corresponding type.
CHEMICAL TANKS
Chemical tanks come in four tiers of gas storage. They are placable, have an interface and can be filled or emptied with pressurised tubes. So for now, you could place pressurised tubes between a tank and the electrolytic separator to store hydrogen for later.

THE ELECTRIC PUMP
If we want to automate the oxygen production, we need a way to constantly input water. We can do this a variety of ways in modpacks, but in this we'll simply cover the electric pump. The electric pump is a powered single block device that will pump any fluid underneath it (or around it). Place the pump above a water source block, and input a power cable on the side that has the green square. The fluids will be pumped out through a mechanical pipe placed on top. We then want to connect the mechanical pipe to the electrolytic separator.
CHOOSING GAS PATHS
With power and water supplied to the electrolytic separator, it will now begin to automatically generate hydrogen and oxygen. These are gases, so we use the pressurised tube. In the input and output UI, when a machine has two possible outputs, they will be labelled 1 and 2. Whatever is on the left will be output 1 and output 2 is whatever is on the right. If you have a chemical tank for hydrogen storage hooked up, you would want to select the pressurised tube connected to the tank and click it until it says, “Output 1”. For the pressurised tube going to the purification chamber, you want to click on that until it says, “Output 2”.
TIER TWO COMPLETE
Now that the purification chamber has an oxygen supply, it will turn its contents into their clump forms. At this stage, inputting one raw ore will give you 2 clumps, which in turn gives you 2 dirty dusts, 2 dusts, 2 ingots. This might not seem like an increase at first, but remember that the enrichment chamber was giving us 4 ingots for 3 raw ores. 3 raw ores through the purification chamber now gives us 6 ingots. The purification chamber can be placed right next to the crusher, which in turn can be placed next to the enrichment chamber and the smelter of your choice. Set the appropriate pathing and turn on auto-eject.
TIER THREE
The next tier involves 3 machines and one multi block structure. In this stage we will make brine, convert that brine into hydrogen and chlorine, turn that into hydrogen chloride which will be inputted into a machine and used to make ore shards. This is the tier that starts to use a lot of iron and steel.
THE THERMAL EVAPORATION PLANT
First let's talk about the multi block structure, the thermal evaporation plant, or TEP for short. The TEP is constructed with a minimum of a 4x4 base and 3x3 height. This is made with thermal evaporation blocks, one thermal evaporation controller and a minimum of two thermal evaporation valves. The structure can be as tall as 18 blocks, and the higher you build it, the more mb per tick it will produce. Being a multi block structure, the TEP will emit redstone particles to indicate it has been built in a functional capacity.
THE RESISTIVE HEATER
To accelerate the rate of production, the TEP needs a heat source. This can be done through the resistive heater. The resistive heater generates heat based on the energy input you set it to. That max it can burn is 10MFE/t. To input heat into the TEP, connect one end of a thermodynamic conductor on a valve and connect the other end to the resistive heater, then supply the resistive heater with power.
TOTAL COSTS
Constructing the TEP will likely take up the bulk of your time in this tier. 4 thermal evaporation blocks take 4
steel and 1 copper. The controller takes 5 blocks, glass and 2 advanced circuits. A valve takes 4 blocks and an
advanced processor. So the materials are as follows:
4x3: 37 blocks 1 controller 2 valves
62 blocks total = 248 steel 62 copper
3 advanced processors and 1 glass pane
BRINE
The purpose of making the TEP is to convert water to brine. We can input water into one valve, output brine from a second valve and possibly have a third valve for increasing the temperature. We will be outputting the brine straight into an electrolytic separator via a mechanical pipe, the brine will be in the leftmost tank where the water normally is in our hydrogen/oxygen separator. This will give us sodium and chlorine.
CHLORINE
We then want to take the chlorine and transfer that to a new machine, the chemical infuser. It’s a gas so we use the pressurised tube. The chemical infuser does as the name implies, it combines two gases to make a new one. We want to combine chlorine and hydrogen to make hydrogen chloride. Luckily we already have a hydrogen production, if it’s convenient to your machine layout, you can pump hydrogen right to the infuser from the first electrolytic separator.
RUNNING OUT OF POWER?
At this point in the process, you might find that running all of these machines simultaneously on the same power source is taxing, and that you may be routinely running out of power and/or your machines are running slower due to the power being stretched very thin. If you haven't already, it might be worth investing in a small fission reactor and turbine combo. Reactors might seem scary due to the seemingly complicated nature and nuclear waste problem, but it's quite manageable with the right precautions.
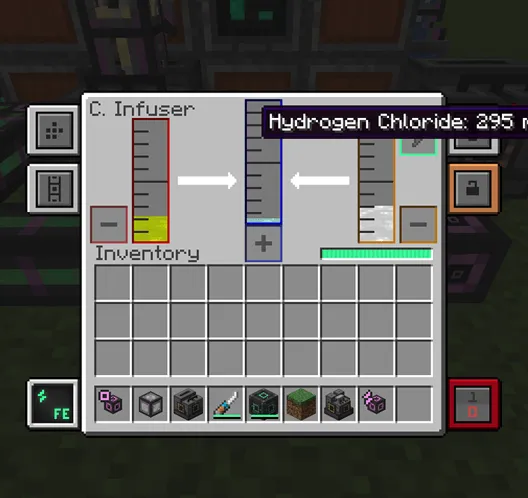
HYDROGEN CHLORIDE
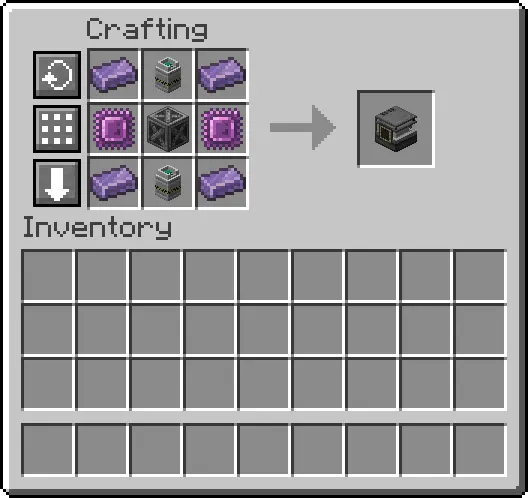
Now that we have our hydrogen chloride, we will be pumping that into the final machine of the tier: the chemical injection chamber. Pressurised tube again, as it is also a gas. The chemical injection chamber will take the hydrogen chloride and make shards. Inputting raw ore here will grant you 8 shards for 3 raw ore. This should then feed into the purification chamber, which will grant you 8 clumps, then 8 dirty dusts, then 8 dusts and 8 ingots in the other machines respectively.
TIER THREE
In this tier we have three new main machines: the chemical washer, the chemical dissolution chamber and the chemical crystallizer. However, there will be far more machines used in this tier than these three. We’ll start from the beginning; we want to make dirty ore slurry. We then want to clean that ore slurry, and turn the clean ore slurry into crystals. We want to feed the crystals into the end of our system, the chemical injection chamber, which turns them into shards.
3 Raw Ore > 2000mb Dirty Ore Slurry > 2000mb Clean Ore Slurry > 10 Ore Crystals > 10 Ore Shards > 10 Ore Clumps > 10 Dirty Ore Dust > 10 Ore Dust > 10 Ingots
DIRTY ORE SLURRY
So how do we make dirty ore slurry? Dirty ore slurry is made using the chemical dissolution chamber, and once we’re done, will be the primary input for the whole process. We will put our ores in this machine to quintuple them. The slurry is made by melting the ores in sulfuric acid. Making sulfuric acid will be the most time consuming part of this tier. Similar to tier three, we need a chain to make hydrogen chloride and we need to mix that with a source of sulfur to get sulfur dioxide. We then combine sulfur dioxide with oxygen to get sulfur trioxide, and finally, we combine sulfur trioxide with water vapour to make sulfuric acid.
MORE HYDROGEN CHLORIDE
So let’s start with hydrogen chloride. You can use the previous setup to fuel this but it will struggle to keep up, so if you want the whole process to run as quickly as it can, it’s recommended to make another setup. This of course is: Brine (From the TEP) into an electrolytic separator to make chlorine and water into another electrolytic separator to make hydrogen. Chlorine and hydrogen go into a chemical infuser to make hydrogen chloride. This will involve one TEP, two electrolytic separators, one chemical infuser and one electric pump outputting to both the TEP and the hydrogen/oxygen separator.
SULFUR
Once we have our hydrogen chloride ready to go, we’re sending that into a new chemical injection chamber via a pressurised tube. This will be combined with gunpowder to make sulfur dioxide. Now, in order to quintuple the many stacks of ores in your storage, we will need a LOT of sulfuric acid, and for that, we need a constant supply of sulfur to mix. This can be a bottleneck of the process, and it is recommended to try and automate a supply. If you’re only playing Mekanism on its own, your main source of sulfur will be gunpowder. However, if you’re playing a modpack, it’s possible to automate gunpowder or sulfur itself in many ways. If you have a source of sulfur from the get-go, you can skip this entire process. It might be cheaper for you to make a sulfur dust farm than it is to make another hydrogen chloride chain. If you’d like to learn about alternative methods, check out the modpack page. Whatever your method may end up being, you can funnel the necessary items into the machine via a hopper or a logistical transporter.
SULFUR DIOXIDE
In order to make sulfur dust, we’ll be combining the hydrogen chloride we made with gunpowder in the chemical injection chamber. Then, we’re sending that sulfur to the chemical oxidizer, which will turn it into sulfur dioxide, no other inputs needed. The main frame of the machine is made with a purification chamber.

SULFUR TRIOXIDE
Next we’re sending the sulfur dioxide to a chemical infuser via some more pressurised tubes. It needs to be mixed with oxygen in order to make sulfur trioxide. You should be able to use the oxygen from the second electrolytic separator you made for the second hydrogen chloride chain. If you skipped that part, it’s recommended to make another electrolytic separator to produce oxygen because if you try to run this chemical infuser off the very first separator you made (the one fuelling your purification chamber) it will struggle a lot, even with upgrades.
WATER VAPOUR
Now we’re sending the sulfur trioxide into another chemical infuser through a pressurised tube In real life sulfur trioxide exists in multiple forms, but in Mekanism we’re only concerned about the gas form. There are two chemical infusers back to back in this process. Instead of oxygen in this one however we’ll be mixing the sulfur trioxide with water vapour. In order to make water vapour, we need another machine.

THE ROTARY CONDENSENTRATOR
The rotary condensentrator (con-den-sen-tray-tor) only takes an input of water and produces water vapour when set to decondensentrate mode. Decondensentrate mode turns liquids to gases. It can also be set to condensentrate, which turns gases back to liquids. With the water vapour and sulfur trioxide mixing in the chemical infuser, we now finally have sulfuric acid. Adding the water vapour makes sulfuric acid a liquid, so we’ll be transferring it via a mechanical pipe. This will be input into our chemical dissolution chamber to make dirty slurries.
THE CHEMICAL WASHER
Placing 3 raw ore of any kind will reward you with 2000mb of dirty ore slurry, now we just need to clean it. We’ll be sending this dirty slurry into the chemical washer, which only requires an input of water. Once cleaned, we can move it into our next and final machine, the chemical crystallizer. Despite both of these having the name “slurry”, both need to be transported via the pressurised tube, not the mechanical pipe.

THE CHEMICAL CRYSTALLIZER
The chemical crystallizer does not require any extra inputs, you can pour the clean ore slurry directly into the machine and it will turn it into crystals. 2000mb of clean slurry will give you 10 crystals, which officially starts your quintupling process. This machine can now be placed directly next to your chemical injection chamber and can be set to auto-eject items. Once run through all the machines you already have set up, you will have 10 ingots smelted at the end. Breathe a sigh of relief, because you’re done!